In November, 2015 we introduced Apache Zeppelin as a technical preview on HDP 2.3. Since then, we have made significant progress on integrating Zeppelin into HDP while working in the Apache community to add new features to Zeppelin.
These features are now available in this Apache Zeppelin technical preview – the second Zeppelin technical preview. This technical preview works with HDP 2.4 and comes with the following major features:
- Notebook Import/Export
- LDAP Authentication
- Ambari Managed Installation
In addition, this tech preview includes improvements made in the community such as auto-save, the ability to quickly add new paragraphs, and stability related fixes.
개요
This tech preview of Apache Zeppelin provides:
- Instructions for setting up Zeppelin on HDP 2.4 with Spark 1.6
- Ambari-managed Install
- Manual Install of Zeppelin
- Configuration for running Zeppelin against Spark on YARN and Hive
- Configuration for Zeppelin to authenticate users against LDAP
- Sample Notebooks to explore
Note: While both Ambari-managed and manual installation instructions are provided, you only need to follow one of the two sets of instructions to set up Zeppelin in your cluster.
Prerequisites
This technical preview requires the following software:
- HDP 2.4
- Spark 1.6 or 1.5
HDP Cluster Requirement
This technical preview can be installed on any HDP 2.4 cluster, whether it is a multi-node cluster or a single-node HDP Sandbox. The following instructions assume that Spark (version 1.6) is already installed on the HDP cluster.
Note the following cluster requirements:
- The Zeppelin server should be installed on a cluster node that has the Spark client installed on it.
- Ensure the node running Ambari server has the git package installed.
- Ensure that Zeppelin server has the wget package installed
Installing Zeppelin on an Ambari-Managed Cluster
To install Zeppelin using Ambari, complete the following steps.
- Download the Zeppelin Ambari Stack Definition. On the node running Ambari server, run the following:
VERSION='hdp-select status hadoop-client | sed 's/hadoop-client - \([0-9]\.[0-9]\).*/\1/''
sudo git clone https://github.com/hortonworks-gallery/ambari-zeppelin-service.git  /var/lib/ambari-server/resources/stacks/HDP/$VERSION/services/ZEPPELIN
- Restart the Ambari Server:
sudo service ambari-server restart
- After Ambari restarts and service indicators turn green, add the Zeppelin Service:
At the bottom left of the Ambari dashboard, choose Actions -> Add Service: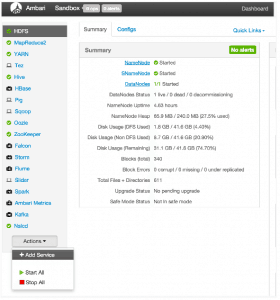
On the Add Service screen, select the Zeppelin service.
Step through the rest of the installation process, accepting all default values.
On the Review screen, make a note of the node selected to run Zeppelin service; call this ZEPPELIN_HOST.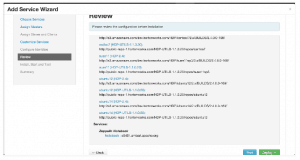
Click Deploy to complete the installation process. - Launch Zeppelin in your browser:
http://ZEPPELIN_HOST:9995
Zeppelin includes a few sample notebooks, including a Zeppelin tutorial. There are also quite a few notebooks available at the Hortonworks Zeppelin Gallery, including sentiment analysis, geospatial mapping, and IoT demos.
(Optional) Installing Zeppelin Manually
The Zeppelin Technical Preview is available as an HDP package compiled against Spark 1.6.
To install the Zeppelin Technical Preview manually (instead of using Ambari), complete the following steps as user root.
- Install the Zeppelin service:
yum install zeppelin - Make a copy of zeppelin-env.sh:
cd /usr/hdp/current/zeppelin-server/lib
cp conf/zeppelin-env.sh.template conf/zeppelin-env.sh
- In the zeppelin-env.sh file, export the following three values.
Note: you will use PORT to access the Zeppelin Web UI. <HDP-version> corresponds to the version of HDP where you are installing Zeppelin; for example, 2.4.0.0-169.export HADOOP_CONF_DIR=/etc/hadoop/conf export ZEPPELIN_PORT=9995 export ZEPPELIN_JAVA_OPTS="-Dhdp.version=<HDP-version>"
- To obtain the HDP version for your HDP cluster, run the following command:
hdp-select status hadoop-client | sed 's/hadoop-client - \(.*\)/\1/'
- Copy hive-site.xml to Zeppelin’s conf directory:
cd /usr/hdp/current/zeppelin-server/lib
cp /etc/hive/conf/hive-site.xml conf/
- Remove “s” from the values of hive.metastore.client.connect.retry.delay and hive.metastore.client.socket.timeout, in the hive-site.xml file in zeppelin/conf dir. (This will avoid a number format exception.)
- Create a root user in HDFS:
su hdfs
hdfs dfs -mkdir /user/root
hdfs dfs -chown root /user/root
To launch Zeppelin, run the following commands:
cd /usr/hdp/current/zeppelin-server/lib
bin/zeppelin-daemon.sh start
The Zeppelin server will start, and it will launch the Notebook Web UI.
To access the Zeppelin UI, enter the following address into your browser, where ZEPPELIN_HOST is the node where Zeppelin is installed:
http://ZEPPELIN_HOST:9995
Note: If you specified a port other than 9995 in zeppelin-env.sh, use the port that you specified.
Configuring Zeppelin Spark and Hive Interpreters
Before you run a notebook to access Spark and Hive, you need to create and configure interpreters for the two components.
To create the Spark interpreter, go to the Zeppelin Web UI. Switch to the “Interpreter” tab and create a new interpreter:
- Click on the +Create button to the right.
- Name the interpreter spark-yarn-client.
- Select spark as the interpreter type.
- The next section of this page contains a form-based list of spark interpreter settings for editing. The remainder of the page contains lists of properties for all supported interpreters.
- In the first list of properties, specify the following values (if they are not already set). To add a property, enter the name and value into the form at the end of the list, and click +.
master           yarn-client
spark.home       /usr/hdp/current/spark-client
spark.yarn.jar   /usr/hdp/current/spark-client/lib/spark-assembly-1.6.0.2.4.0.0-169-hadoop2.7.1.2.4.0.0-169.jar
- Add the following properties and settings (HDP version may vary; specify the appropriate version for your cluster):
spark.driver.extraJavaOptions -Dhdp.version=2.4.0.0-169
spark.yarn.am.extraJavaOptions -Dhdp.version=2.4.0.0-169
- When finished, click Save.
Note: Make sure that you save all property settings. Without spark.driver.extraJavaOptions and spark.yarn.am.extraJavaOptions, the Spark job will fail with a message related to bad substitution.
- In the first list of properties, specify the following values (if they are not already set). To add a property, enter the name and value into the form at the end of the list, and click +.
To configure the Hive interpreter:
- From the “Interpreter” tab, find the hive interpreter.
- Check that the following property references your Hive server node. If not, edit the property value.
hive.hiveserver2.url jdbc:hive2://<hive_server_host>:10000
Note: the default interpreter setting uses the default Hive Server port of 10000. If you use a different Hive Server port, change this to match the setting in your environment.
- If you changed the property setting, click Save to save the new setting and restart the interpreter.
Creating a Notebook
To create a notebook:
- Under the “Notebook” tab, choose +Create new note.
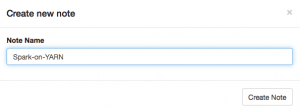
- You will see the following window. Type a name for the new note (or accept the default):
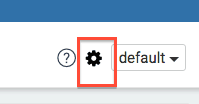
- You will see the note that you just created, with one blank cell in the note. Click on the settings icon at the upper right. (Hovering over the icon will display the words “interpreter-binding.”)
- Drag the spark-yarn-client interpreter to the top of the list, and save it:
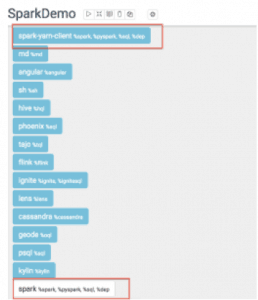
- Type sc.version into a paragraph in the note, and click the “Play” button (blue triangle):

SparkContext, SQLContext, ZeppelinContext will be created automatically. They will be exposed as variable names ‘sc’, ‘sqlContext’ and ‘z’, respectively, in scala and python environments.
Note: The first run will take some time, because it is launching a new Spark job to run against YARN. Subsequent paragraphs will run much faster. - When finished, the status indicator on the right will say “FINISHED”. The output should list the version of Spark in your cluster:

Importing External Libraries
As you explore Zeppelin you will probably want to use one or more external libraries. For example, to run Magellan you need to import its dependencies; you will need to include the Magellan library in your environment.
There are three ways to include an external dependency in a Zeppelin notebook:
Using the %dep Interpreter
(Note: this will only work for libraries that are published to Maven.)
%dep
z.load("group:artifact:version")
%spark
import ...
Here is an example that imports the dependency for Magellan:
%dep
z.addRepo("Spark Packages Repo").url("http://dl.bintray.com/spark-packages/maven")
z.load("com.esri.geometry:esri-geometry-api:1.2.1")
z.load("harsha2010:magellan:1.0.3-s_2.10")
For more information, see https://zeppelin.incubator.apache.org/docs/latest/interpreter/spark.html.
Adding and Referencing a spark.files Property
When you have a jar on the node where Zeppelin is running, the following approach can be useful:
Add spark.files property at SPARK_HOME/conf/spark-defaults.conf; for example:
spark.files /path/to/my.jar
Adding and Referencing SPARK_SUBMIT_OPTIONS
When you have a jar on the node where Zeppelin is running, this approach can also be useful:
Add SPARK_SUBMIT_OPTIONS env variable to the ZEPPELIN_HOME/conf/zeppelin-env.sh file; for example:
export SPARK_SUBMIT_OPTIONS="--packages group:artifact:version"
Stopping the Zeppelin Server
To stop the Zeppelin server, issue the following commands:
cd /usr/hdp/current/zeppelin-server/lib
bin/zeppelin-daemon.sh stop
LDAP Authentication Configuration
This version of the TP, allows users to authenticate users and provide separation of notebooks.
Note By default Zeppelin is enabled to receive requests over HTTP & not HTTPS. When you enable LDAP Authentication for Zeppelin, it will send username/password over HTTP. For better security, you should enable Zeppelin to listen in HTTPS by enabling SSL. You can use SSL properties specified in this doc. Also note at this time Zeppelin does not send the user identity downstream and we are working to address this before Zeppelin goes GA.
To enable authentication, in /usr/hdp/current/zeppelin-server/conf/shiro.ini file edit the section and enable authentication [urls]
#/** = anon
/** = authcBasic
For local user configuration, enable the section [users]
admin = password1
user1 = password2
user2 = password3
Alternatively for LDAP integration, enable the section [main]
#ldapRealm = org.apache.shiro.realm.ldap.JndiLdapRealm
#ldapRealm.userDnTemplate = cn={0},cn=engg,ou=testdomain,dc=testdomain,dc=com
#ldapRealm.contextFactory.url = ldap://ldaphost:389
#ldapRealm.contextFactory.authenticationMechanism = SIMPLE
For more information on Shiro please refer http://shiro.apache.org/authentication-features.html
Sample Notebooks
Zeppelin includes a few sample notebooks, including a Zeppelin tutorial. There are also quite a few notebooks available at the Hortonworks Zeppelin Gallery, including sentiment analysis, geospatial mapping, and IoT demos.
Known Issues
- Zeppelin does not yet send user identity downstream after LDAP authentication.
If you need help or have any feedback or questions with the tech preview, please first check out Hortonworks Community Connection (HCC) for existing questions and answers. Please use the tag tech-preview and zeppelin.
HDP 를 사용하지 않고 직접 구성한 경우 Spark Master 설정과 메모리 설정을 적절하게 해주지 않으면 Web ui는 실행하더라도 Spark 관련된 작업을 할 때 오류가 발생한다.
출처: http://ko.hortonworks.com/hadoop-tutorial/apache-zeppelin-hdp-2-4/
'Biz > Etc' 카테고리의 다른 글
| 배치로 Hive 로 보내기 (0) | 2016.04.03 |
|---|---|
| Loading RCFile Format Data into Oracle Database (0) | 2016.03.25 |
| Bringing ORC Support into Apache Spark (0) | 2016.03.25 |
| A Lap Around Apache Spark on HDP (0) | 2016.03.25 |
| Learning the Ropes of the Hortonworks Sandbox (0) | 2016.03.25 |
댓글